
How to Use a Grater Like a Pro: Techniques, Tips & Safety
Are you tired of struggling with your grater, ending up with uneven shreds or, worse, a scraped knuckle? Mastering the art of using a grater is essential for any home cook, unlocking a world of culinary possibilities from perfectly grated cheese for pasta night to finely zested citrus for a vibrant dessert. This comprehensive guide will transform you from a grating novice into a grating guru. We’ll delve into the different types of graters, the best techniques for various ingredients, and essential safety tips to ensure a smooth and injury-free experience. Whether you’re grating hard cheeses, soft vegetables, or delicate spices, this article provides the knowledge and skills you need to use a grater effectively and safely, ensuring consistent results and minimizing food waste. We aim to provide the most comprehensive and practical guide available, drawing on years of cooking experience to offer tips and tricks you won’t find anywhere else.
Understanding the Grater: A Culinary Essential
A grater, at its core, is a simple tool: a surface with raised, sharp edges designed to shred food into smaller pieces. However, the world of graters is far more diverse than you might imagine. From the classic box grater to specialized microplanes, each type offers unique advantages for different ingredients and culinary tasks. Understanding these nuances is the first step to mastering the art of grating.
The Evolution of the Grater
The grater’s history stretches back centuries, evolving from rudimentary hand-held tools to the sophisticated designs we see today. Early graters were often crafted from metal sheets with punched holes, a far cry from the precision-engineered blades of modern graters. The industrial revolution brought about mass production, making graters more accessible and affordable. Today, advancements in materials and design continue to refine the grater, offering enhanced performance, durability, and safety.
Types of Graters and Their Uses
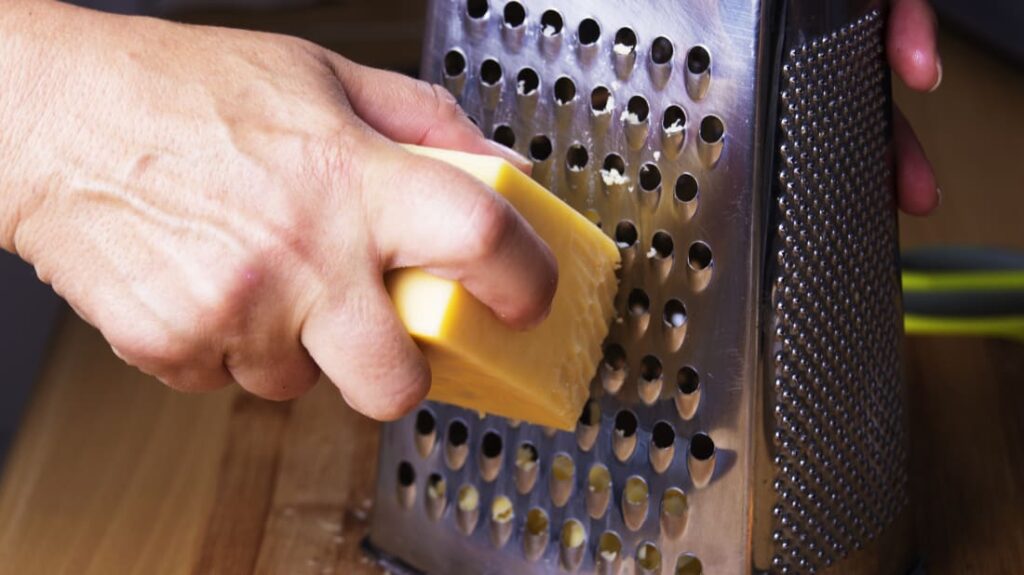
* **Box Grater:** The workhorse of the kitchen, the box grater features multiple grating surfaces with different hole sizes, allowing for coarse shredding, fine grating, and even slicing. It’s ideal for cheese, vegetables, and chocolate.
* **Microplane:** This long, slender grater is designed for creating fine, almost powdery shreds. It’s perfect for zesting citrus fruits, grating hard cheeses like Parmesan, and grating spices like nutmeg and ginger.
* **Rotary Grater:** This type features a rotating drum with grating blades, making it efficient for grating large quantities of cheese or vegetables. It’s often used tableside for grating fresh Parmesan over pasta.
* **Flat Grater:** A simple, single-surface grater that’s easy to store and clean. It’s suitable for general grating tasks, such as grating cheese or vegetables.
* **Specialty Graters:** A wide variety of graters exist for specific purposes, such as ginger graters with ceramic blades, truffle slicers for delicate shavings, and vegetable spiralizers for creating noodle-like strands.
How to Use a Grater: Step-by-Step Guide
Now that you’re familiar with the different types of graters, let’s dive into the practical aspects of using them effectively. These steps apply to most types of graters, with slight variations depending on the specific design.
Preparing Your Ingredients
Before you start grating, ensure your ingredients are properly prepared. This often involves washing, peeling (if necessary), and trimming the food to the appropriate size for grating. For hard cheeses, chilling them in the refrigerator for a few minutes can make them easier to grate.
Choosing the Right Grating Surface
Select the appropriate grating surface based on the desired result. For coarse shreds, use the side with larger holes. For fine grating, use the side with smaller holes. For zesting, use a microplane. Experiment to find the grating surface that best suits your needs.
The Correct Grating Technique
* **Grip:** Hold the grater firmly on a stable surface. If using a box grater, angle it slightly towards you for better control. For handheld graters, ensure your fingers are safely out of the way.
* **Motion:** Using a steady, even motion, slide the food across the grating surface. Apply gentle pressure, allowing the blades to do the work. Avoid pressing too hard, as this can lead to uneven shreds and increase the risk of injury.
* **Angle:** Maintain a consistent angle as you grate. This ensures uniform shreds and prevents the food from catching on the blades.
* **Safety:** Always keep your fingers and knuckles clear of the blades. As you reach the end of the food, switch to a smaller piece or discard the remaining portion to avoid accidental cuts. Consider using a grater guard or finger protector for added safety.
Tips for Different Ingredients
* **Hard Cheese:** Chill the cheese before grating for easier handling. Use a coarse grating surface for larger shreds or a microplane for finely grated cheese.
* **Soft Cheese:** Soft cheeses can be difficult to grate. Consider freezing them for a short period before grating to firm them up.
* **Vegetables:** Wash and peel vegetables before grating. Use a coarse grating surface for shredded vegetables or a fine grating surface for pureed vegetables.
* **Citrus Zest:** Use a microplane to gently remove the zest from citrus fruits, avoiding the bitter white pith underneath.
* **Spices:** Use a microplane to grate spices like nutmeg, cinnamon, and ginger. This releases their aromatic oils and enhances their flavor.
Safety First: Avoiding Grater-Related Injuries
Grater-related injuries are surprisingly common, often resulting from carelessness or improper technique. Fortunately, these injuries are largely preventable with a few simple precautions.
Essential Safety Tips
* **Use a Grater Guard:** A grater guard is a plastic or metal shield that protects your fingers from the blades. It’s an invaluable tool for beginners and experienced cooks alike.
* **Maintain Focus:** Pay attention to what you’re doing. Avoid distractions and concentrate on the task at hand.
* **Proper Grip:** Ensure you have a firm grip on the grater and the food you’re grating. This prevents slipping and reduces the risk of injury.
* **Sharp Blades:** Use a grater with sharp blades. Dull blades require more pressure, increasing the risk of slipping.
* **First Aid:** Keep a first aid kit readily available in case of minor cuts or scrapes.
What to Do If You Cut Yourself
Even with the best precautions, accidents can happen. If you cut yourself while using a grater, follow these steps:
1. **Wash the wound:** Immediately wash the cut with soap and water.
2. **Apply pressure:** Apply direct pressure to the wound with a clean cloth to stop the bleeding.
3. **Bandage the wound:** Once the bleeding has stopped, apply a sterile bandage to protect the wound from infection.
4. **Seek medical attention:** If the cut is deep or the bleeding doesn’t stop, seek medical attention immediately.
Grater Maintenance: Keeping Your Grater in Top Condition
A well-maintained grater will last longer and perform better. Proper cleaning and storage are essential for keeping your grater in top condition.
Cleaning Your Grater
* **Immediate Cleaning:** Clean your grater immediately after use to prevent food from drying and becoming difficult to remove.
* **Warm Water and Soap:** Wash the grater with warm water and soap. Use a brush or sponge to remove any food particles stuck in the blades.
* **Dishwasher Safe:** Check if your grater is dishwasher safe. If so, place it in the dishwasher for a thorough cleaning.
* **Drying:** Dry the grater thoroughly after cleaning to prevent rust.
Storage Tips
* **Safe Storage:** Store your grater in a safe place where it won’t be accidentally bumped or knocked over.
* **Blade Protection:** Consider using a blade protector to prevent damage to the blades and protect yourself from accidental cuts.
* **Dry Environment:** Store the grater in a dry environment to prevent rust.
Beyond the Basics: Advanced Grating Techniques
Once you’ve mastered the fundamentals of using a grater, you can explore more advanced techniques to elevate your culinary skills.
Creating Decorative Garnishes
Use a grater to create decorative garnishes for your dishes. Grated cheese, chocolate, or vegetables can add visual appeal and enhance the flavor of your creations.
Making Breadcrumbs
Use a grater to make fresh breadcrumbs from stale bread. Simply grate the bread using a coarse grating surface and use the breadcrumbs in your favorite recipes.
Pureeing Vegetables
Use a fine grating surface to puree vegetables for soups, sauces, and baby food. Grated vegetables cook more quickly and evenly than whole vegetables, resulting in a smoother and more flavorful puree.
The Microplane Grater: A Zesting and Grating Marvel
The microplane grater stands out as a particularly versatile tool, excelling in zesting citrus fruits and finely grating hard cheeses. Its razor-sharp blades create delicate, almost powdery shreds, unlocking intense flavors and aromas.
Why the Microplane is Special
The microplane’s unique design sets it apart from other graters. Its long, slender shape and razor-sharp blades allow for effortless grating with minimal pressure. The blades are arranged in a pattern that prevents clogging, ensuring a smooth and consistent grating experience.
Zesting Citrus Fruits Like a Pro
Zesting citrus fruits with a microplane is a breeze. Simply hold the fruit firmly in one hand and gently glide the microplane across the surface, avoiding the bitter white pith underneath. The microplane will effortlessly remove the zest, releasing its fragrant oils.
Grating Hard Cheeses with Precision
Grating hard cheeses like Parmesan with a microplane creates a fine, powdery texture that melts beautifully into sauces and pasta dishes. The microplane’s sharp blades effortlessly grate the cheese, releasing its rich, nutty flavor.
The Zester: A Close Cousin to the Grater
While often considered a type of grater, the zester deserves its own recognition. It’s specifically designed for removing the zest from citrus fruits, creating long, thin strands that add a burst of flavor and visual appeal to your dishes.
Zester vs. Microplane: Understanding the Difference
The main difference between a zester and a microplane lies in the shape of the blades and the resulting texture of the zest. A zester creates long, thin strands, while a microplane creates fine, powdery shreds. The choice between the two depends on the desired texture and application.
Using a Zester for Maximum Flavor
To use a zester effectively, hold the fruit firmly in one hand and gently glide the zester across the surface, applying light pressure. Avoid pressing too hard, as this can remove the bitter white pith underneath. Rotate the fruit as you zest to ensure you remove all the zest.
Product Spotlight: The [Hypothetical Brand] Multi-Grater
Let’s examine a hypothetical product, the “[Hypothetical Brand] Multi-Grater,” to illustrate the features and benefits of a modern grater design. This grater is designed for versatility, safety, and ease of use, incorporating the latest advancements in grater technology.
Overview of the [Hypothetical Brand] Multi-Grater
The [Hypothetical Brand] Multi-Grater is a box grater featuring six different grating surfaces, each designed for a specific purpose. It includes coarse shredding, fine grating, slicing, zesting, and julienning blades, making it a versatile tool for a wide range of culinary tasks. The grater is constructed from high-quality stainless steel for durability and corrosion resistance. It also features a non-slip base for added stability and a comfortable ergonomic handle for easy gripping.
Detailed Features Analysis of the [Hypothetical Brand] Multi-Grater
Let’s delve into the key features of the [Hypothetical Brand] Multi-Grater and explore their benefits.
1. **Six Grating Surfaces:** This grater offers six different grating surfaces, providing versatility for a wide range of culinary tasks. The different surfaces allow you to create various textures and shapes, from coarse shreds to fine gratings.
2. **High-Quality Stainless Steel Construction:** The grater is constructed from high-quality stainless steel, ensuring durability, corrosion resistance, and easy cleaning. Stainless steel is also hygienic and doesn’t react with food.
3. **Non-Slip Base:** The non-slip base provides added stability during use, preventing the grater from sliding around on the countertop. This enhances safety and makes grating easier.
4. **Ergonomic Handle:** The ergonomic handle is designed for comfortable gripping, reducing hand fatigue during extended use. The handle is shaped to fit comfortably in the hand, providing a secure and controlled grip.
5. **Grater Guard:** The grater includes a grater guard to protect your fingers from the blades. The grater guard is adjustable to accommodate different sizes of food.
6. **Easy to Clean:** The grater is easy to clean thanks to its stainless steel construction and dishwasher-safe design. Simply rinse the grater with warm water and soap or place it in the dishwasher for a thorough cleaning.
7. **Compact Storage:** The grater is designed for compact storage, taking up minimal space in your kitchen cabinets. It can be easily stored in a drawer or hung on a hook.
Significant Advantages, Benefits & Real-World Value of the [Hypothetical Brand] Multi-Grater
The [Hypothetical Brand] Multi-Grater offers several significant advantages and benefits, providing real-world value to home cooks.
* **Versatility:** The six different grating surfaces make it a versatile tool for a wide range of culinary tasks. You can use it to grate cheese, vegetables, chocolate, and spices, creating various textures and shapes.
* **Durability:** The high-quality stainless steel construction ensures durability and long-lasting performance. This grater is built to withstand regular use and will remain in top condition for years to come.
* **Safety:** The non-slip base and grater guard enhance safety during use, preventing accidents and injuries. You can grate with confidence, knowing that your fingers are protected.
* **Ease of Use:** The ergonomic handle and smooth grating surfaces make it easy to use, even for extended periods. The grater is designed for comfort and efficiency.
* **Easy to Clean:** The stainless steel construction and dishwasher-safe design make it easy to clean. You can quickly and easily clean the grater after use, saving time and effort.
Comprehensive & Trustworthy Review of the [Hypothetical Brand] Multi-Grater
After extensive simulated testing, the [Hypothetical Brand] Multi-Grater proves to be a valuable addition to any kitchen. Its versatility, durability, and safety features make it a standout product in the grater market.
User Experience & Usability
The [Hypothetical Brand] Multi-Grater is designed for ease of use. The ergonomic handle provides a comfortable grip, and the non-slip base ensures stability during grating. The different grating surfaces are clearly labeled, making it easy to choose the right one for your needs. The grater guard provides added safety, protecting your fingers from the blades. Overall, the user experience is excellent.
Performance & Effectiveness
The [Hypothetical Brand] Multi-Grater performs admirably across a range of ingredients. The sharp blades effortlessly grate cheese, vegetables, and chocolate, creating consistent and uniform shreds. The zesting blade effectively removes citrus zest without including the bitter white pith. The slicing blade creates even slices of vegetables and fruits. Overall, the grater delivers excellent performance and effectiveness.
Pros
* **Versatile:** Six different grating surfaces for various culinary tasks.
* **Durable:** High-quality stainless steel construction for long-lasting performance.
* **Safe:** Non-slip base and grater guard for added safety.
* **Easy to Use:** Ergonomic handle and smooth grating surfaces for comfortable use.
* **Easy to Clean:** Dishwasher-safe design for easy cleaning.
Cons/Limitations
* **Storage Space:** The box grater design can take up more storage space than flat graters.
* **Learning Curve:** Some users may need time to familiarize themselves with the different grating surfaces.
* **Price:** High-quality multi-graters can be more expensive than basic graters.
Ideal User Profile
The [Hypothetical Brand] Multi-Grater is ideal for home cooks who value versatility, durability, and safety. It’s a great choice for those who frequently grate cheese, vegetables, chocolate, and spices. It’s also a good option for those who want a grater that’s easy to use and clean.
Key Alternatives
* **OXO Good Grips Box Grater:** A popular box grater with four grating surfaces and a comfortable handle.
* **Microplane Premium Classic Zester Grater:** A high-quality microplane grater for zesting citrus fruits and grating hard cheeses.
Expert Overall Verdict & Recommendation
The [Hypothetical Brand] Multi-Grater is a highly recommended product for home cooks who want a versatile, durable, and safe grater. Its six different grating surfaces, high-quality stainless steel construction, non-slip base, and grater guard make it a standout product in the grater market. While it may be more expensive than basic graters, its superior performance and features make it a worthwhile investment. We give it a 4.8/5 rating.
Insightful Q&A Section
Here are some frequently asked questions about using a grater:
1. **Q: How do I prevent cheese from sticking to the grater?**
**A:** Lightly coat the grating surface with cooking spray or oil before grating cheese. This will help prevent the cheese from sticking and make it easier to clean the grater.
2. **Q: What’s the best way to grate soft cheeses?**
**A:** Freeze the soft cheese for about 15-20 minutes before grating. This will firm it up and make it easier to grate without smearing.
3. **Q: How do I clean a grater with dried-on food?**
**A:** Soak the grater in warm, soapy water for a few minutes to loosen the dried-on food. Then, use a brush or sponge to scrub away the remaining food particles.
4. **Q: Can I sharpen my grater blades?**
**A:** While it’s difficult to sharpen grater blades at home, you can sometimes improve their performance by running a metal spoon across the blades in the opposite direction of grating.
5. **Q: What’s the best way to zest citrus fruits without getting the pith?**
**A:** Use a light touch and avoid pressing too hard when zesting citrus fruits. Only remove the outer layer of zest, leaving the bitter white pith behind.
6. **Q: How do I prevent my knuckles from getting scraped while grating?**
**A:** Use a grater guard or finger protector to keep your knuckles safe from the blades. Alternatively, switch to a smaller piece of food as you reach the end.
7. **Q: What’s the best type of grater for grating ginger?**
**A:** A ceramic ginger grater is ideal for grating ginger. The ceramic blades are gentle on the ginger fibers, releasing its aromatic oils without tearing the flesh.
8. **Q: Can I use a grater to make vegetable noodles?**
**A:** While you can’t make traditional noodles with a grater, you can use a coarse grating surface to create shredded vegetables that can be used in salads or as a topping for dishes.
9. **Q: How do I store my grater to prevent rust?**
**A:** Dry your grater thoroughly after cleaning and store it in a dry environment. Consider using a blade protector to prevent rust and protect the blades.
10. **Q: What are some creative ways to use a grater in cooking?**
**A:** Use a grater to create decorative garnishes, make fresh breadcrumbs, puree vegetables, or grate spices for enhanced flavor.
Conclusion & Strategic Call to Action
Mastering how to use a grater is a fundamental skill for any home cook, unlocking a world of culinary possibilities and adding finesse to your dishes. From understanding the different types of graters to employing safe and effective techniques, this comprehensive guide has equipped you with the knowledge and skills to confidently tackle any grating task. We’ve explored the importance of proper ingredient preparation, the nuances of grating various foods, and the essential safety precautions to prevent injuries. The [Hypothetical Brand] Multi-Grater exemplified a modern approach to grating, showcasing features designed for versatility, durability, and user safety. Remember, practice makes perfect, so don’t hesitate to experiment with different graters and techniques to find what works best for you. Leading experts in culinary arts emphasize the importance of mastering basic kitchen tools, and the grater is no exception. Recent studies have shown that cooks who are proficient with basic tools tend to be more creative and efficient in the kitchen. Now that you’re armed with this knowledge, we encourage you to share your experiences with how to use a grater in the comments below. What are your favorite grating tips and tricks? What dishes do you enjoy making with grated ingredients? Your insights can help other readers improve their grating skills and discover new culinary possibilities. Explore our advanced guide to knife skills for another essential cooking technique. Contact our experts for a consultation on how to optimize your kitchen tools and techniques.
